Using
After setting up an instance (or having your sysadmin
doing this for you) you can now log into the webapp using the temporary
password. Simply add ?instance=XXX to the url where odk_planner is
located

If you’re new to using odk_planner please proceed with the tutorial that describes how setup a working configuration.
Uploading form template
The very same Excel sheets that are used as input to XLSForm also serve to describe the content of
the databases to the odk_planner. The grouping used in the spreadsheet is
replicated when content of individual forms is displayed. Note that the xls
forms must have the same filename as the ones that were used to generate
the xml files (which is not necessarily the same as the form_id in the
settings sheet of the xls form).
A simple access control system is provided by using an additional column
access in the excel form: If this column is not existing or empty, the
string default is assumed to be its content. Whenever a user views a form,
a field is only displayed if the user’s acl configuration parameter
contains at least one of the comma-separated names that are listed in the
access column. Group names can be freely defined apart from the predefined
name default – the following example chose the
group names sensitive and secretary. If a field has the special access
group sms, then its value can be sent via short messages.
Forms can be managed by any user having the “forms” right. The form overview page is displayed by navigating through the forms menu item on top of the page. This page shows an overview of all uploaded forms in a table.
If there was a problem in the matching between database columns and form
.xls fields, it is displayed in the “info” column of this overview table.
A not matched indicates that the corresponding form could not be matched
with any form in the database – make sure the .xml form was uploaded to
the aggregate server.
This view also allows to delete forms and upload new ones. Make sure
your spreadsheet has the extension .xls and is in Microsoft Excel
97/2000/XP/2003 format.
Example of access restrictions
access column |
user’s acl |
result |
|---|---|---|
| (empty or missing) | default |
can view |
sensitive |
default |
can’t view |
sensitive, default |
default |
can view |
sensitive, secretary |
default, sensitive |
can view |
Overview entered forms
The main purpose of odk_planner is to shows an overview of all entered
forms (as far as their corresponding .xls form has been uploaded) so far in
a structured way. The different forms are linked together using a special field
$idfield that must be present in every individual form. The overview table
view displays all forms submitted so far, with all forms having the same
$idfield arranged in a row. For every form the submission date is
displayed. It is possible to have more than one submission of the same form for
the same $idfield – this would be displayed with two different submission
date/times.
The “colors” sheet in config.xls specifies the temporal
interdependance of the different forms. Normally, a follow-up form is expected
to be submitted after a given delay. If the time period between two forms is
longer than specified (or if the follow-up form has not been submitted yet and
the current date is alreday considered “late”), the corresponding field in the
overview table is highlighted.
The data of individual submissions can be viewed by clicking on the submission
date/time (user needs data right).
.csv generation
In the upper left corner of every overview table there is a button that will
generate a .csv list of missing forms. Whether a highlighted cell should be
included in this list is specified by the value of its “list” column. These same lists are also generated and attached
to emails when the script is run autonomously.
Viewing data
After selecting a submission for display by clicking on it in the overview
table, its contents are arranged following the structure of the corresponding
uploaded .xls form. Individual form fields can be selectively (masked)
from users by using a access column in the .xls form. See above for more on access restrictions.
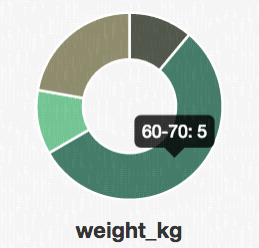
Doughnut plot
The plugin dougnut generates overview plots that show the distribution of
a field of interest over the whole study population. Ordinal data is put into
pre-specified bins before plotting. The example below shows the weight
distribution in the demo dataset.
Sending SMS
If participants save their phone number in a form, this information can be used to send short messages. Refer to sms sheet for proper configuration.
Messages can be sent manually: Click on the small letter symbol next to the participant ID in the overview table to get to a message screen. The phone number can be choosen from a drop down and the message can be either a pre-defined template or a free text.
Autogenerating messages
This SMS feature can also be used in a semi-autonomous fashion. The same rules that are used to color the overview table can also be used to auto-generate messages from templates. A small widget on top of every overview table indicates how many messages are generated as a result of these rules (also showing the number of automatically generated messages already sent).
Automatization
The PHP file called cron.php can be executed on the server and will
generate an overview. Different components of the odk_planner can register
to use this overview to generate output. Log messages are added to the
log file cron. At every script invocation, an
email is sent to the notify email address.
Currently, the following actions can be performed autonomously
- Automatically sending autogenerated messages to participants (if
!is added to the template name in the additional configuration).- Creating lists of missing forms and attaching them to the email (on the days specified in the cron configuration).
Log files
The directory log/ contains different log files that can be examined through
the web interface (in the admin page). Additionally, an update on any of
these logs can be sent to the the notify email address.
user: logins and login attemptscron: log of actions that were performed autonomouslysms: list of SMS that were sentmass-sms: list of patient ID / template title of short message